
Please scroll down to follow this project!
-------------------------------------------------------------------------------
The next projects will be shown on my new page: work in progress 2--------------------------------------------------------------------------------------------------------------------------------
One of my dearest friends has asked me to knit a scarve for her Blythe dolls; she makes them herself, the dolls I mean. She gave me one.......little Frankie is living in my bear-palace! She has such beautiful eyes!!! 4 colours.......I can change them. WOW!
Now, I love to knit! My friend sent me lovely wool and I understood she prefers an open texture. What I did was take needles in the sizes 3,5 up to 6 and I made an example. She can have a look and see if it is what she likes. When finished I shall add a pic on page crocheted/knitted with the pattern!
In the meantime I'm thinking about what my next creation will be. On TeddyTalk.com someone invited people to join a challenge for a bunny rabbit.....until now I think I am the only one who likes to join the challenge but it might take some time before everybody has read her invitation. We will see!
I do have a beautiful VERY long-pile faux-fur given to me by Thelma from TCfolk.com.
As you might know by now I have a "problem" with long-pile......and that problem is: ME. I'm hesitating....but as they say: the best way to get rid of your fears is facing them.......I've decided to use that fur. It will be a bigger creation and I am thinking of the pattern now. One of these days I will draw it, when I've made up my mind and then I will give it a try! WHAT a challenge!!!
I'll be back! Pink
----------------------------
Designing.......I think we all have our own method and here I show you mine. Basicly I start with an idea and make a drawing. I need to do this to check the proportions and the model. First I draw a vertical line and add circles or shapes for all the parts. "Working free" I call my method and it means I'm not stuck to specific sizes but design what I like; nevertheless I keep proportions in mind.
Here is a pic of the first drawing and I already think if I want to make a more vintage-look creation maybe I should make the body longer. Also, it may be necessary to make the head a bit bigger (higher) if I am not going to use a gusset. The darts create volume but also take some "space" away. I need to check it with a piece of paper where I close the darts to find out if the shape of the head is still ok or too short. It is fun to play this way!
btw: the limbs are not on the right place yet! I'll add the arms more backwards than the legs, just like "we" are! Normally it helps to make a stand alone creation but this time it won't be able to stand alone with the bended legs!
I'll be back when I've made some progress again!

Thursday, a cold day!
I continued designing and finally cut the head out of paper and closed the darts:

The footpaws, how do I design them? like this:
 | |
| I always design half a footpaw to make sure both sides are equal (if that's what I want). I use this metermaatje which can bend to check the sizes. Piece of cake! |

and here is a pic of the head with the fur outside:
 | ||
| isn't that surprising?! |
I decided not to worry too much already about how to do the eyes and scissor-sculpting.....my friend said to me that the fabric is very forgiving! You can see a gorgeous doggie she made from the fabric, complete with armature, on her website and Bearpile! TCfolk....... Thelma I bet you follow my project and maybe you are proud of me??!!! HA!
One more thing I want to tell you is that I have a mini-vacuum-cleaner on my desk to remove all the hairs. It can not be healthy all these hairs and they are all over the place and myself so I keep cleaning! Just don't want to get it in my throat! or nose, which is a quite big one!
Here is a pic from the rabbit in progress:
 |
| I think it is very special already! |
Tea-time!!!!! Later!
Friday....
Making progress here! I have 2 arms ready and also the body. First I made the arms and then I started with the body. As it took SO much time to get all hairs to the right direction I thought: Oh...who cares, cut the hairs before sewing! So much easier to work with.....just do it!
I did it!!!! Piece by piece and the great thing is that it DOES work so much easier! Took my time to cut the hairs, nice music on the background....and thinking of my friend who told me many times I CAN scissor-sculpt.....yes, now I trust myself!
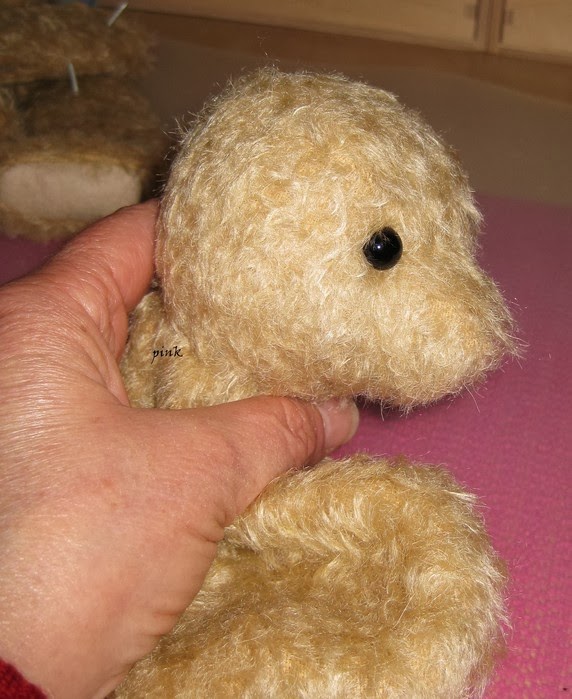
Stuffed the head and added the eyes. Big ones to be honest because otherwise you won't see them I thought. Asked my brother (he lives with us) what he thought of the eyes? He agreed! Great! 2 people know more than 1!
I did some scissor-sculpting on the face.....yesterday, and today I thought it was not good enough yet. I did some more and now I'm happy with the result. I did cut a lot, believe me!
Here is a pic:
(the ears are not added yet, they are pinned to the head)

Must go on with the legs and find some fabric for the paws and inner-ears, have nothing yet. Think I will be back beginning next week. Not sure if I can find some fabric in our town, we do not have such a shop here and the shop where I could find some is only opened end of the weeks......it doesn't matter because I haven't made up my mind yet about the colour and the kind of fabric.
I don't want rabbit to be a look-a-like for a real rabbit, it is simply not my style. Nevertheless it is very important which fabric I choose.....
Wishing you a lovely and wonderful weekend! Pink
Monday, cold again!
The ears......were such a struggle! I found a nice fabric and sewed it to the long-pile fur.
 |
| as you can see it was a disaster! The fabric is lovely but the ears started to curl......no way that I could fix this! |
 |
| didn't work either; too stiff. Phew.....! |
I decided to cut the ears shorter.....no pic but it was not what I intended to do for my rabbit. Ofcourse I found out this after cutting the ear! It also was too thick. Oh dear......now what to do???? Made 4 ears already....
With the wise words from my friend in the back of my head: "there is nothing I can't fix!" I kept on thinking how to solve this problem. The ears are very important.....I need good ears.........and my friends words kept me company all the time. I slept the night over it and thought I had to search in my closet for a lovely mohair....and found it! White, great combination with the long-pile fur!
I crossed my fingers and started to sew one ear (luckely I have enough long-pile fur!)...and it was not bad at all but...stiff! How oh how am I going to fix this?????
Suddenly I saw "the light" and searched for my hairbrush-fohn....found it! Never use it.....
Mohair is what the name says: hair. I can use this fohn, no problem there! I did:
 | |
| left the fabric dry....tenderly I kept turning the fohn....not making the fabric too hot......and I felt it was becoming softer.....hurray! |
 |
| I left the ears this way for a night and was very surprised to find out the ears were OK now! |
 |
| all I have to do now is take a little bit wet comb and pull it gently thrue the mohair. I use this method very often; I let it dry and the hairs stay the way I left them! I NEVER use wax, gel or what-ever for my creations! The new owners must be able to comb if they like! No sticky things on my creations! |
I'm going to give it a try now! Later!
Tuesday and it feels like spring! A bird is making a nest in our garden!
The legs must be sewn. First I started with cutting the fabric from the seams and it took me a long time to do this in a neat way. Gave some left-over hair to the bird that is making a nest!
Time for the footpaws, not my favourite thing.......and as my husband got ill I'm not sure if I can find time tonight but I'll see!
Here is a pic from the legs so far:
 | |
| here are 2 legs....1 inside and 1 outside.......I stitched the top of the feet twice and now I can add the footpaws. As a matter of fact I had cut the paws from the same fabric I had for the ears which turned out to be a disaster so the best thing I could do now is cut new paws and I have chosen (never know if I must write this with double oo) for the white mohair I used for the inner-ears. Until now I still think it is very exciting to make this rabbit! I'm really very curious to see the final result! Josephine, if you read this: thank you for your sweet comments and I know you are curious too! Honestly speaking it is quite a job this one! |
Later! Thank you for your visit! Pink
----
Thursday, a lovely day!
 |
| One done! I must do the leg itself and then I will start with the other paw.....tomorrow! As you can see the direction of the hairs is to the toes. Never knew this until I did read in a German bear-magazin, where they show a tutorial, that it should be done this way. To me it doesn't always matter but this time I used this method. I'm happy with the result. Maybe I will needle-felt toes, not sure yet and I must look at the internet how it looks like in real (hmmm....I saw a dead rabbit on the road today.....but I couldn't take a closer look......I mean I COULDN'T ....poor rabbit.....) |
Saturday 8 March 2014, most warm 8 March ever!!!
We went outside, on our bikes, to a garden-centre. Got us some Lavender and seeds for butterfly- and bees-fowers. Nice!
This evening I finished all the sewing for the rabbit (except adding the ears). It was hard, really, to sew the footpaws. It was even harder to make a neat seam at the openings but: done!
Here is are 2 pic's:

 |
| ahh...! I can almost see the rabbit laying on it's tummy! Lovely result with the fabric! |
Tuesday.....
it has been such lovely weather that we were outside a lot! This morning I started stuffing the poor waiting rabbit and so far so good. It was hard to see the seams I had to close! all those hairs.....!
Time to joint rabbit!
Here is a pic:
 |
| looks lovely I think. After jointing I will have to do some more scissor-sculpting, maybe some needle-felting and ofcourse I must add the ears! Tempting.....! |
Still Tuesday!
Done! at least I think so but, as some of you know, many times I changed my mind after a while so we will see!
I decided not to make too many details because the fabric itself is so beautiful and deserves all the attention; it is Steiff Schulte 5920-D from Edinburgh in case you would like to know. Don't know if it is still available.
Did I like making this rabbit? YES. Will I make another creation from this kind of fur? PROBABLY. Will I do this within 3 months? NO! : - )))))
Now let me show you the pic's:
 | |
I think rabbit has forgiven me, do you?
 |
| hmm....still a bit upset...... |
 |
| think I heard a sigh....... |
 |
| going better already, leaning back a little....... |
 |
| ahh......we are friends again! if rabbit sits like this it wants me to put my back against it's back and sit very cosy together......just a minute rabbit! |
What I like very much is that you can give rabbit different expressions by simply change the direction of the hairs around the eyes.
Also, I have chosen to sew on the ears this way because somehow it must represent a -made-by-Pink-creation- and as I said before my intention was not to make a look-a-like for a real rabbit. I'll leave that to others who really like that and, let's be honest, who are pretty good at it.
Some more details: I added glass-beads in the feet and the tummy (a lot); the total length is appr. 12 inches / 30 cm. The other stuffing is polyester. I used 25mm disc's for the arms and the head; I used 30mm disc's for the legs and very strong cotterpins for the legs because of the weight of the feet.
I did not make a tail because you will hardly see it with this fur. Finally: I shaded very lightly around the eyes and around the nose with a copic-marker.
Now it is time to clean my bear-palace again because hairs are everywhere again! Btw I wrote that I had put some hairs in the garden for the birds-nest but tiny other birds got is and flew away with it! funny!
The pattern will be added as soon as possible this week. Must make the drawing.
Phew....! Rabbit born!
Thank you Thelma Craghead for this challenge! do you remember last year you were the one who suggested to make a rabbit of this fur?! xxx
Thank you guests for following this project! Highly appreciated!
I'll be back soon with a new project..... Pink
----------------------------------------------------------------------------------------------------------------------------
Pappa bear (hmm...Daddy in English)
Wednesday......it felt a bit like spring this morning!
While I was thinking about having a little bear-making break I was cleaning up my room, which was necessary with all the threads laying on the floor. I opened my "bear-closet" and looked to find some room there....and suddenly I saw a white basket. White basket???? Oh Oh...!!!! what's inside??? Remember the long-pile bear I started with and then I decided to go on with "in between" projects? Completely forgotten this one! How sad for this bear! Very ashamed I took the parts out of the basket and found out I had done the legs, paws included. INCLUDED! Hurray! Well bear, let's go on then!
Now, I'm stitching the gusset into the head, by hand, twice. I've experimented with the sewing-machine and it works. I sew once, take all hairs to the right side, and sew again to make the seams stronger. I'm really glad it works! OK, sometimes I must do a little part again but I think practice is doing well!
I shall try to make pic's later today!
Later!
I have been busy......laundry, cleaning, walked to the super-market and forgot 2 things but husband was so sweet to go by car! Can't be my age I believe.......!
Did some stitching and here is a pic from Pappa bear in progress:

... the size is appr. 26 cm / 10 inches but after stuffing bear will be shorter.
Maybe you are wondering "what is she talking about, long-pile"??? but believe me, for ME this is long-pile! I managed! I really really prefer open sparse and felted fabrics, or the viscose to work with. Eventhough you cannot "hide" little mistakes with the short-piles! Well, that's ok with me because I don't want to hide anything! Hand-made is hand-made!
I think this bear will look lovely and huggable but I'm already wondering "how on earth am I going to make a beautiful face and what to do with the nose???" I'll see! Let the fabric and the bear surprise me!
Maybe more tomorrow! Thanks for looking! Pink
-----
Thursday...storm again!
The head has been stuffed.
Eyes....I was hesitating... black eyes or brown with a black pupil eyes. As bear is Pappa bear and belongs to the family Bobo Bebe and Bubu, who all have black eyes, I have chosen for the black eyes.
The disc's have been added to the limbs, the openings are smaller now, so, next thing to do is stuffing!
Here is a pic of the head!
a couple of hours later.....
 |
| the limbs have been added! now it is a fluffy bear! |
 |
| a stuffed bear! |
 | ||
| so, bear has a nose! It was a matter of time to find out that bear had a very YOUNG look in the beginning and to find out how to make it older. I scissor-sculpted the snout a little and added some colour, very lightly. I have chosen for a vintage-look nose from wool. Also, I scissor-sculpted the hand- and footpaws a bit. Time to make the ears now! |
Later!
------
Sunday, a sunny day indeed!
Pappa bear is ready! He belongs to his family! I think this mohair is great and gives a soft look to a bear! It is Steiff Schulte mohair...
Here are pic's!
 |
| Pappa bear |

 |
| Pappa bear is not really a stand alone........ |
 |
| family portrait! |
 |
| "this guy is in love......"! |
Thanks for looking! I'll be back soon!
Have a nice day! Pink
----------------------------------------------------------------------------------------------------------------------
Saturday, storm outside, more to come they say!
This time I found my inspiration in this fabric:

-----and more inspiration in a "head with no gusset" because I think it is very interesting to try to succeed to make a head like that with a good shape......well, I need to make darts then!
This is what I started with:

I started with a basic shape - a circle. Tried to imagine what kind of snout I want to make. Added darts and tried to imagine what should happen of I close them: the shape will change ofcourse. After a few attempts I got this result.

they are not the same: the first one is smaller. I've chosen for the second one and am curious to see the result in fabric because fabric does a lot to a pattern. Viscose has no stretch (my viscose).....a thing to remember!

In my last project I showed all except the foot-paws. Here I'm going to show how I make them. Maybe you can see that my footpaw is shorter than the foot itself......I like that shape and you will be able to see the result when stitched.
In this project I've chosen a different way to make it a bit easier for me to stitch:


 |
| inside |
 |
| outside; I can check now if it looks all-right |
Must go on now! Will be back with more later! Wishing you a lovely day!
-----
Monday.....grey but dry and no storm!
I did go on with the foot-paws, not my favourite part so I needed some "girl-power"!
Done!
 | ||
| many times I wonder how people who make micro-mini bears do the paws.....I respect them so much! |
Bear has been put together and I made a nice collar for it. On it's head there is a little circle from double fabric, with a red glass-bead. I want to keep the design kind of simple....I like that.


I think the bear is cute...but...too neat at this moment. I like it to be more vintage-look. What I did is shade details with tea....and I am not ashamed at all to tell that I didn't really like the result! These things happen and many times it depends on how much I "dare" to do with shading and also the combination of shading and the fabric.
I did decide to blend a little and dye more......and now bear is drying....I must be patience! Are you curious? So am I!!!!
I'll be back later! Have a nice day!
Done! I was a bit nervous tho! I like the result eventhough it is far behind my comfort zone. For such a long time I've tried to make a vintage creation....and I bet my Danish friend Lotte has laughed a lot in silence because she is a real star in making shabby- or vintage-look creations! (katinkadoll, you can find her on etsy.com)
Like I said before, I hand-dyed more with tea and used a big brush. Little bear had to dry and I almost couldn't wait...."will it be OK????" .....
Here are some pic's! The pattern has been added on page free patterns! Hurray! Enjoy!


Sitting down it measures appr. 11 cm / 4,4 inches and the total length is appr. 16 cm / 6,5 inches.
Bear has a wobbly head.
Thank you for following my project! No idea what to make next but I'll be back! Till then! Pink
-----------------------------------------------------------------------------------------------------------------------------
I started with a new project called replica of Anneke.

I think the bear is cute...but...too neat at this moment. I like it to be more vintage-look. What I did is shade details with tea....and I am not ashamed at all to tell that I didn't really like the result! These things happen and many times it depends on how much I "dare" to do with shading and also the combination of shading and the fabric.
I did decide to blend a little and dye more......and now bear is drying....I must be patience! Are you curious? So am I!!!!
I'll be back later! Have a nice day!
Done! I was a bit nervous tho! I like the result eventhough it is far behind my comfort zone. For such a long time I've tried to make a vintage creation....and I bet my Danish friend Lotte has laughed a lot in silence because she is a real star in making shabby- or vintage-look creations! (katinkadoll, you can find her on etsy.com)
Like I said before, I hand-dyed more with tea and used a big brush. Little bear had to dry and I almost couldn't wait...."will it be OK????" .....
Here are some pic's! The pattern has been added on page free patterns! Hurray! Enjoy!
Sitting down it measures appr. 11 cm / 4,4 inches and the total length is appr. 16 cm / 6,5 inches.
Bear has a wobbly head.
Thank you for following my project! No idea what to make next but I'll be back! Till then! Pink
-----------------------------------------------------------------------------------------------------------------------------
I started with a new project called replica of Anneke.
Her pattern is on page free patterns!
This time I used completely different fur and I am very curious to see the result and difference in the end!
You can follow this project by pictures:

I'm going to stitch the snout now....
Till then!
Yesterday I found some time to go on:
ahh...to be continued again!
---- Let me tell you about my "30 minutes" rule! Like many other "older" women and men there are these little inconveniences in hands and neck..but, as my dear friend in Arizona (she is so wise you know!) says: "we are not getting older...just better!!!" ---and right she is!!!--- there is a solution! I work 30 minutes and then take a brake......in the beginning it was hard to do because I feel happy while creating.... but nowadays? I stick to my rule! Feels much better! Maybe a tip for someone following my projects?!
OK, 2 more pic's to share!
Btw: I got a question from Josephine from Creation (did you look at her blog already? TIP!) about the size of this bear: sitting down appr. 12 cm / 4,5 inches and the total length is appr. 16 cm / 6 inches....estimated!
You can easily decrease or increase the pattern but keep in mind: in general- the bigger the bear the smaller the head....
30 minutes are over now! Later!
.......it's a rainy and dark day so time enough to stitch a bit!
Note:
I'm aware that many bear-makers cut the hairs away before they stitch the seam......I only do this with long-pile fur. I'm still always kind of nervous to cut the hairs because if you cut too much it will show. I use an embroidery needle to get all the hairs to the right sides....I do it twice on both sides of the fur and bend the seams open.....works for me! After all: making a bear must be fun and relaxing!

You can follow this project by pictures:
 | ||
| I have this little basket......and yesterday evening I have cut all the fabric; made a mistake there with the direction of the ears so did those again today! Glad I found out now! |
 | |||
| The gusset has been stitched together; I have basted the seam backwards because I think it looks better with this fabric this way |
 | |||
| I had to puzzle a bit......but it must be done like this! now, how do I stitch this? |
 | ||||||
| now, one curve goes inside and the other goes out-side.... |
 | |
| I always make a "helping-me" stitch to keep everything in place |
 |
| basted.....stitch by stitch |
 |
| and here is the other side |
 | ||
| I always feel happy when I see this! a bear coming my way! |
Till then!
Yesterday I found some time to go on:
 |
| all stitched |
 |
| and again I basted the seam backwards; I do this to be able to stuff neat; afterwards I remove the thread ofcourse |
 |
| time to stitch the dart! |
 |
| my little secret? every time my hands start hurting I stop stitching and go on with other things like here, pin everything together; here you see the handpaws and inner-arms; I will stitch them with a little bow so the hands will bend inside a bit; pic's will be shown when done! |
ahh...to be continued again!
---- Let me tell you about my "30 minutes" rule! Like many other "older" women and men there are these little inconveniences in hands and neck..but, as my dear friend in Arizona (she is so wise you know!) says: "we are not getting older...just better!!!" ---and right she is!!!--- there is a solution! I work 30 minutes and then take a brake......in the beginning it was hard to do because I feel happy while creating.... but nowadays? I stick to my rule! Feels much better! Maybe a tip for someone following my projects?!
OK, 2 more pic's to share!
 |
| here the darts in the head have been stitched and I basted them backwards |
 | ||
| Usually I don't baste the snout (in this pic the chin) because I use extra stripes to guide while stitching....but this time I decided to baste twice, once inside and once outside the line. To me it is very important to get the snout ok and if you use 2 colours of fur it is so much more neat to keep everything in place! Even 2 mm can make a big difference already...it will show! |
Btw: I got a question from Josephine from Creation (did you look at her blog already? TIP!) about the size of this bear: sitting down appr. 12 cm / 4,5 inches and the total length is appr. 16 cm / 6 inches....estimated!
You can easily decrease or increase the pattern but keep in mind: in general- the bigger the bear the smaller the head....
30 minutes are over now! Later!
.......it's a rainy and dark day so time enough to stitch a bit!
 |
| the chin has been stitched |
 |
| good side of the chin |
 |
| I added the "helping me" stitches! |
 |
| I use to start just next to the middle of the gusset and baste until appr. the spot for the eye; when done I go back stitching to the middle again. At this point I already start checking if the seam of the chin is in the middle of the gusset!!! |
 |
| Phew! both sides done! Now I turn the fabric to the good side and check again if the seam is in the middle of the gusset; if not.....I start all over again! |
 |
| the sides of the head have been stitched too! I made the seam shorter and added fray-check to avoid raffling. My seams are always a little bit longer I think.....never had a problem there! I try to cut the seams un-equal, so one longer than the other....it will show less! |
I'm aware that many bear-makers cut the hairs away before they stitch the seam......I only do this with long-pile fur. I'm still always kind of nervous to cut the hairs because if you cut too much it will show. I use an embroidery needle to get all the hairs to the right sides....I do it twice on both sides of the fur and bend the seams open.....works for me! After all: making a bear must be fun and relaxing!
30 minutes rule.... Thanks for looking!
Monday.....here are some more pic's!
more to come! thanks for looking!
Tuesday already!
Now, let me tell you I didn't make foot-paws at all.....because I like this critter-bear the way it is and I think the feet are better this way for this one..... and I gave critter-bear a nice little tail stuffed with glass-beads.
FINISHED!!!!!


Sitting down it measures appr. 10 cm / 4 inches and the total length is appr. 12,5 cm / 5 inches.
I really think it is fun to see the differences between the 2 fabrics! Completely different bears!
If you want to follow my next project.......one of these days come back! Thanks! Pink
-----------------------------------------------------------------------------------------------------------------------------
Finally! I've made up my mind what to make next. Chosen a lovely mohair and will make a doggie. I'm pretty curious to see the difference between the same doggie in viscose and mohair. The fabric does so much for your creation. Looking forward to a couple of cosy hours!

Monday.....here are some more pic's!
 |
| here you can see I how I stitched the paw and the arm to make the paw bend inside |
 |
| body done, seams of the opening in the back basted |
 |
| arms done; seam of the paw basted backwards |
 |
| an ear; I use a "helping me" black thread to let me see where to bend the fabric inside; then I stitch the seam |
 |
| helping threads removed, ears closed (I close them but not everybody does so) |
 |
| legs stitched, size of the disc's chosen, wool-felt to protect the fabric |
 |
| all cotter pins done; the remaining wool-felt and disc's are for the body |
 |
| the head has been closed as invisible as possible |
 | ||
| ahh...!!!! all "helping me" threads have been removed; bear has eyes now! I used a shoe-button eye for the nose and added a small piece of felting wool with my needle-felting needle; I gave the bear a smile...... |
Tuesday already!
 |
| stuffed! I added glass-beads in the feet, the cotterpins are there and everything has been closed. |
 | ||
| the head and the limbs are jointed to the body. Before I stuff the body I close the opening in the back a bit more! |
Now, let me tell you I didn't make foot-paws at all.....because I like this critter-bear the way it is and I think the feet are better this way for this one..... and I gave critter-bear a nice little tail stuffed with glass-beads.
FINISHED!!!!!
Sitting down it measures appr. 10 cm / 4 inches and the total length is appr. 12,5 cm / 5 inches.
I really think it is fun to see the differences between the 2 fabrics! Completely different bears!
If you want to follow my next project.......one of these days come back! Thanks! Pink
-----------------------------------------------------------------------------------------------------------------------------
Finally! I've made up my mind what to make next. Chosen a lovely mohair and will make a doggie. I'm pretty curious to see the difference between the same doggie in viscose and mohair. The fabric does so much for your creation. Looking forward to a couple of cosy hours!
In the background you can see my pin-cushion; I made it a year ago I believe and gave her the name Josephine then. She was with us when we joined a bear-show in Austria.....now I'm thinking of it, she is a little bit older already! This cute little critter sits on a cushion made of lining, decorated with beads and real Swiss lace. She keeps me company all the time when I'm sewing my creations.
If you ask me she is looking at me right now....like she is saying: doggie waiting!
Must go then! Later!
----------------------------------------------------------------------------------------------------------------------------
So far so good; everything has been stitched together, the disc's are where they belong, I've made little seams.....now it is time to close the openings a bit more, to stuff and assemble everything. Most of the time first I decorate the head but this time I'll leave it alone until everything else has been done......I think....

Looks like a little doggie already don't you think so?!
Later!
------------------------------------------------------------------------------------------------------------
Yep, mini doggie is ready. It was quite a struggle this time but in the end I succeeded....phew! however, I enjoyed it very much!
When I find the time I shall add the pattern!
First I show a picture where you can see that I always use extra fabric when I use washers for disc's:
 I do this to protect the fabric and most of the time I use wool-felt.
If you ask me she is looking at me right now....like she is saying: doggie waiting!
Must go then! Later!
----------------------------------------------------------------------------------------------------------------------------
So far so good; everything has been stitched together, the disc's are where they belong, I've made little seams.....now it is time to close the openings a bit more, to stuff and assemble everything. Most of the time first I decorate the head but this time I'll leave it alone until everything else has been done......I think....
Looks like a little doggie already don't you think so?!
Later!
------------------------------------------------------------------------------------------------------------
Yep, mini doggie is ready. It was quite a struggle this time but in the end I succeeded....phew! however, I enjoyed it very much!
When I find the time I shall add the pattern!
First I show a picture where you can see that I always use extra fabric when I use washers for disc's:
Doggie is a stand alone and measures appr. 9 cm / 3,5 inches. She got lace bows on her ears and she has been aged a bit. The nose is a glass-eye. Steiff Schulte felted mohair in a lovely colour between brown and liver I think. The inside of the ears is soft-pink felted mohair.
I tried to give doggie a not TOO much decorated look..........
I tried to give doggie a not TOO much decorated look..........
Now, here are some pic's from doggie and I shall try to make better pic's tomorrow by day-light!


I think it is very interesting to see the difference between the fabric of Roosje (viscose) and this mini doggie!
 |
| Roosje |
In my opinion they look very similar and.....not similar at at all! Do you agree?!
Thanks for looking! I'm going to knit a bit tonight and think what to design next!
as promised: pic's by daylight:


and I also changed something on Kareltje; removed the beads and gave him a little bell


--------------------------------------------------------------------------------------------------------------------------
Ah...mini rabbit is ready! 10 cm / 4 inches.......I hand-dyed the viscose with tea:

In the glass of tea I dropped a bow to get a lovely colour.
Here are the pic's (I'm not a good photographer and we DO have 2 photographers in the house....but I don't always want to ask......)
 |
| the bow is on top of the head and I crocheted a scarf |


 |
| hug me!!!!!!!! |
 |
| well....well......! |
Later!
here are pic's by daylight!


thanks again for looking!
---------------------------------------------------------------------------------------------------------------------------------
The assembling and stuffing of my mini-rabbit:
 the size of the disc: I try to add a disc which leaves about 3 to 4 mm fabric left-over; these are fiber-discs but sometimes I use washers instead
here are pic's by daylight!
thanks again for looking!
---------------------------------------------------------------------------------------------------------------------------------
The assembling and stuffing of my mini-rabbit:

disc's for the limbs have been added with a cotter-pin and YES, it happened once to me that I joined the right leg on the leftside of the body!

My dear friend TC told me to close the openings a bit before stuffing....why didn't I think of that myself?! it makes stuffing and closing so much easier!


assembled!!! time to stuff, here is the result:

-----------------------------------------------------------------------------------------------------------------------------
Finally, all parts from this tiny rabbit have been stitched. This time I even used the sewing-machine for the ears and the legs. It is great that I can decide which speed my sewing-machine is going to use.....SLOW!
I used to hesitate using the machine; small bears etc. can be very hard to do neat that way but this time, hurray! I succeeded!
Tonight, if I find some time, I will assemble rabbit and tomorrow I hope to decorate it!
Here is a pic...I love the ears already!
 | ||
| I think it will be appr. 4,5 inches / 10 cm when ready |
5mm /5mm. When I succeeded with the pattern it will be on my page free patterns. (btw if you have a tip for me HOW TO place a pdf for example, please let me know!) About the gusset: I always make them a bit longer when I cut the fabric and I always fold them double and cut the paper that way to get equal sides!!!!!

------------------------------------------------------------------------------------------------------------------------------- OK, today I found some time to stitch the body:

I hope to go on tomorrow!
------------------------------------------------------------------------------------------------------------------------------
Little rabbit, making progress! Head has been stitched:
 |
| Done! Fray-check added....... |
 |
| Right side out now! I already like the texture! |
 | ||
| I always make a little seam to achieve a neat joint... |
Time for the limbs!
Later!
---------------------------------------------------------------------------------------------------------------------------------
Here is another little bag. It is the same pattern but I used a thinner cotton and a needle 2 mm. This time I wanted to find out what it looks like when you add bigger wool-felt.
Tip: make all the decorations before you join the parts together! (I didn't.....phew....)
Some how it turned out to be an "Indian-look" bag......a bit of nostalgy to me and I like that look!

Rabbit waiting!
------------------------------------------------------------------------------------------------------------------------------
Little bag is finished! I hand-dyed the crocheted parts, made an "inside-bag" because there are holes in the parts and finally I added some lace and glass-beads and 1 pearl (no, not a real one!). I like to make these bags and will make more! This bag I had to make with the materials I had in stock......must get me some lace! Here are some pictures:

 | |
| this little bear.....just jumped into this bag! |
 | |||
| weird, the bear left and now I find this little note.......curious what it says!!!! |
Almost midnight here, time to go to sleep! Maybe till tomorrow!
hmmm..............where did this little bear go????????!!!!!
--------------------------------------------------------------------------------------------------------------------------------
Finally I made up my mind and decided to make a mini rabbit! I use a lovely off-white viscose. Just started!

Also started with a little crochet experiment....I try to design a mini-bag. After several attempts I think I have the right design so far, but maybe I will make it with a smaller yarn. Will finish this one first. Here is a picture to start with:

To be continued!
-----------------------------------------------------------------------------------------------------------------------------
thinking about a new project......I'll be back!
-------------------------------------------------------------------------------------------------------------------------------
Please scroll down to see total project
While I'm thinking about a new project I make a little hold-your-hand bear. These little bears have a disc-jointed head but the body is one part. I think it is fun to make them, specially the details I add afterwards.
I found a piece left-over mohair which is too small for a bigger bear and I don't like to throw it away.
Here are some pic's and more to come!
In the meantime I try to design a little piggie; never did this so it is a bit of a challenge!
Later!


Today was a relaxed day where I found the time to go on with my project.
Here are some pictures again from this project:

 |
| from here you can see how I knot things together; I use this method for jointing the eyes too and the advantage is that I never need an extra person to help to keep the knot in place! Also, I don't need much power to do this! Piece of cake! |


 |
| disc-joint for the head |

 | ||||
| all stuffed and stitched, now I can go on decorating! |
Next I embroidered a tiny red tongue. The ears are made from wool-felt with fray-check for extra strength.
Finally I added a scarf with a bead.


it is not a bear......I THINK it is a home-less cat from another planet! appr. 10 cm / 4 inches. Did I tell you already that I LOVE to make critters?!
Thanks for looking!
----------------------------------------------------------------------------------------------------------------------------
The other project I was working on, the in between project as I call it, well, I must confess only one leg done.

In the meantime I took my treasure - my box with mohair and viscose - out of the drawer and am looking at it. IN the drawer there is even more gorgeous fabric given to me by TC, one of my dearest friends. I will leave it there until I have enough self-confidence to use it in the right way. Practise!
my box:

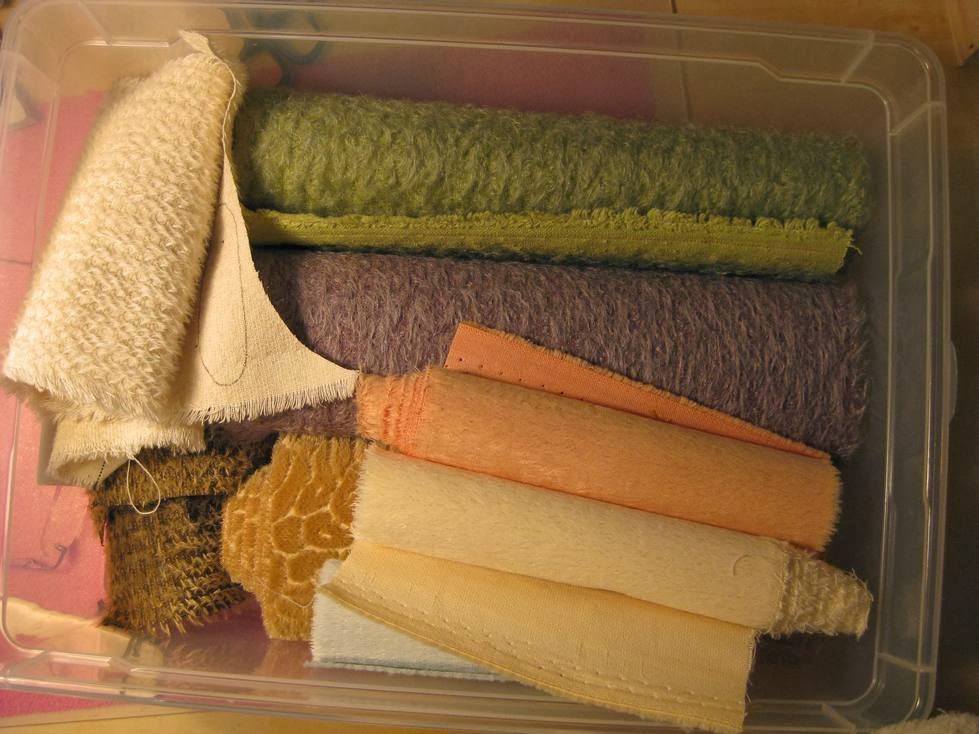
I will keep you informed about my decision which mohair and which design! Must draw with a pencil a little first!
Now some daily bla-bla.....I'm rather good at it I believe! These days, I don't like them very much. Always happy when it is January 2nd again. Don't know why. Something in the air.....people getting "excited" it seems....fire-work noise...specially in the middle of the night but here it is not as bad as in the city where we lived before. Shopping...shopping...shopping.....gosh do I dis-like supermarkets. We don't do very special things, not for Christmas, not for 31 December. O well, we cooked a nice dinner because friends came but not SPECIAL if you know what I mean. Shall I make a confession??? Most of the time on 31 December I go to bed as soon as the noise has gone or at least got less.
Hmmm.....maybe we can play Scrabble that evening! I like that! Or maybe I can do some "bearing"?!!! That would be so nice!
That's me......but what I really want to say is that I hope you all will have a wonderful evening and a wonderful beginning for the next year!!!!!
I wish you so much luck and health and love for the coming year!!!!! I'll drink to that!!!!!! BE WELL!!!!
Hugs, Pink
------------------------------------------------------------------------------------------------------------------------------
Time to think about a new project! I have lovely mohair and viscose in different colours and hope to find some time the next days to design a new creation! I'll be back soon!
-------------------------------------------------------------------------------------------------------------------------------
rabbit for a friend
please scroll down to follow this project!
I'm going to make a rabbit.....for a friend. Yesterday I hand-dyed the fabric and ofcourse ofcourse the water with paint popped into my gloves.....nice blue fingers!
The rabbit is a person in my friends gorgeous books. Now, designing this rabbit makes me wondering how does my friend see this rabbit and how do I see this rabbit? Think best thing to do is make my interpretation of the rabbit. I've designed a pattern, not too many details, kind of simple so the details and specially the head and expression must "do the work" as I call it. Said so easy... now wait and see!
Here is a picture and I'm curious to see the final result! To be continued.......

......and now, a few hours later, I made the legs longer (it doesn't show in the picture) and have started stitching the rabbit. I always stitch by hand twice. Here is a sneak preview:


I will make sure the ears can move up-wards too.....did it before......and I have found out that the colour I hand-dyed is a difficult colour in my opinion. Luckely rabbit doesn't need too much coloured details!
Now??? time for a nice cup of tea! to be continued......
-----------------------------------------------------------------------------------------------------
Christmas time....it is a busy time I think! I didn't have much time to go on with my friends rabbit but I did a few things: first of all doing some research before cutting too much fabric I found a drawing of this rabbit in my friends books and rabbit has a white dot on his chest, a white tail and the inner-ears are white. So, I made some changes again. Really thought rabbit was entirely blue!
Two ears stitched and it was hard to turn the fabric to the right side but with patience....I succeeded. Before adding them to the head I try to find the right position and take my time to do so. I have a tiny glass vase where I put the head on and leave it there for a while; sometimes the next day I think I must change something.
What I am thinking about now is shall I wire the ears? Think so because that way the shape of the ears can be changed.....next thought is of course how shall I do this in a neat way? It is not nice if the end of the wire is sharp. Think I must bow this or even better, make the end round. How do I get it back into the ears but still leave the wire straight....the opening is very small. I will sleep over this tonight!
I have added the ears to the head with pins and put it on the vase now! New day tomorrow!
I also will change the colour of the embroidery of the snout...I think! I'll see!


-----------------------------------------------------------------------------------------------------------------------------
Chest done!


Took some time to stitch this carefully together but DONE!
Now it is time to stitch the rest of the body.....
Later!
-----------------------------------------------------------------------------------------------------------------------------


Today I gave rabbit another expression by changing the embroidery. This rabbit "does a lot of thinking" so I had to change it. Also, it is a boy.....
One foot-paw done, one more to do! Still thinking about the ears!
Later!
------------------------------------------------------------------------------------------------------------------------------


Rabbit.......is ready! I have made changes, for example the ears. In the end I decided not to wire them.
Almost forgot the little white tail! Rabbit has been stuffed with polyester and glass-beads and is a stand alone. It really is nice and it made me happy to make this rabbit specially for a friend! Now, I hope she likes rabbit!
-------------------------------------------------------------------------------------------------------------------------------
Mr. Rouge
Here are some pic's from the continuing (now I don't know how to write this word correct and don't find it in my dictionary???) story of work in progress:


and here is the final result, after I crocheted a nice beret (we call it baret):

appr. 7 cm / 2,8 inches. Stand alone with a little patience; head is disc-jointed, limbs are thread-jointed. Glass-eyes with loop.
I call him Mr. Rouge......
at this moment I'm multi-tasking and I don't do that very often but the bigger one is kind of tempting to me so every now and then I go on with the red mini-bear......
red mini, 7 cm and only 1 arm and 2 legs to go.......


now, I have some bears waiting! Later!
Geen opmerkingen:
Een reactie posten
Thank you very much for your comment! Pink